MULTI BEAM DISH
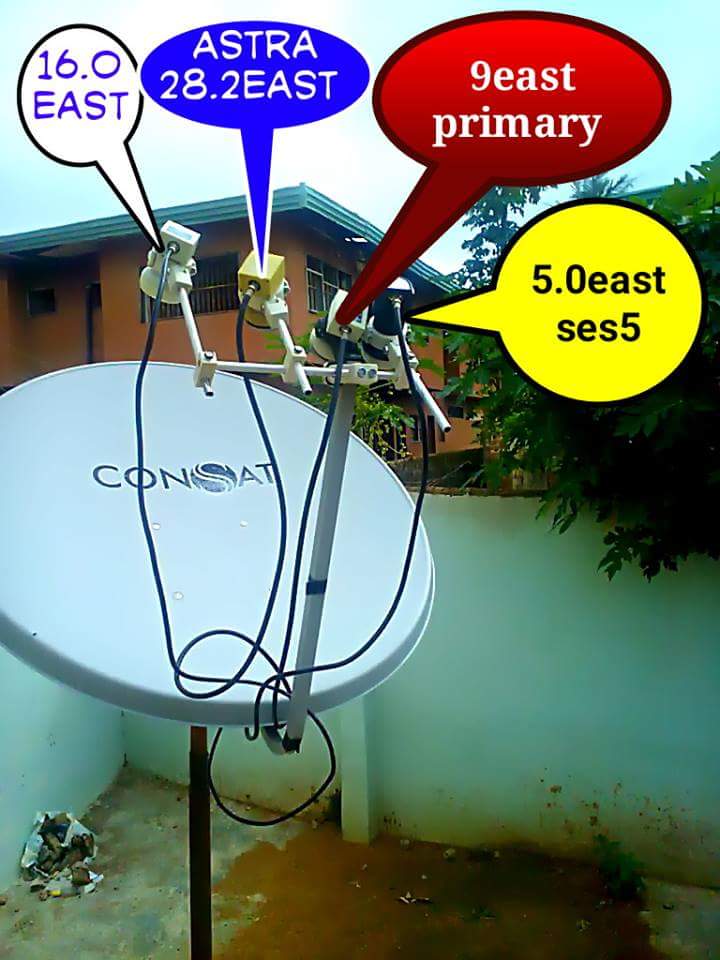
A satellite dish can receive signals from multiple satellites by using one LNB for each satellite. This configuration has advantages and disadvantages. The main advantage over a motorized dish is that you can change channels quickly, but the non-center LNBs will receive lower quality signal.
The multiple LNB bracket must keep a constant focal distance and must follow the inverted reflection ofClarke orbit. The focal distance depends on antenna and orbit reflection depends on location. The distance between LNBs is proportional with dish diameter. Later I will show how these parameters affect the LNB bracket shape and size.
But now, let’s see what kind of brackets you can build and how will you attach a LNB to them.
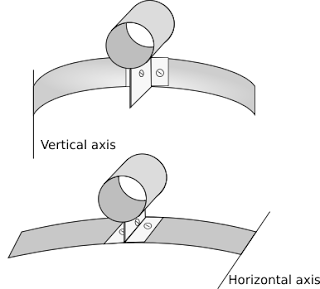
The two types oh holders you can build
The first type (upper) uses a metal sheet bent as an arc shape and it sits vertically with the LNBs attached as shown. The second type is an arc shape trimmed sheet that sits horizontally. I would recommend this second type because it is easier to adjust. You can make the bracket from 1 – 2 mm thick aluminium sheet or 0.5 – 1 mm stainless steel.
If you choose the horizontal type, the parameter you take into account for cutting the metal sheet is the focal distance (this is what makes it easy to build for various satellite positions). For the second type, you must follow the orbit projection.
Focal distance
The holder must keep a constant focal distance for the side LNBs. The focal distance is a dish parameter that you should know from its specifications. If you don’t, you can measure it. It is the distance from the point on the dish where the LNB “looks at” and the original LNB holder. The best way to measure it is to insert a 4 cm diameter PVC pipe through the LNB holder and see where it “points to”. Then measure its length. No matter what kind of dish you have, the pipe should point to the horizontal center (in the middle of the horizontal width of dish measured at the current point).
How to measure the focal distance of an offset dish
Now, that you know the focal distance you can make a template for your bracket. You must draw an arc with a radius equal to the focal distance. You can do this with an inextensible wire and a pencil by holding one end of the wire still on the table and drawing with the pen while tied by the wire. Or you can use a drawing software and print the result.
Inkscape example
Inkscape can be used. Draw three circles: one with the focal distance radius and the other ones with a radius smaller by 1 cm and greater by 1 cm. Align the circles in order to “catch” an arc on the page then print it. This is the template for a horizontal type bracket, but can be used for vertical type too, if you bend your piece following the circle (arc) of interest.
The holder should be equally spaced with regard to the center of the dish.
The bracket should have a width of 2 cm and a length of 40 cm to have enough to play with. It’s up to you how you attach it to the dish arm, but keep in mind that you must take into account each LNB holder (I will detail later how you can build those).
Orbit
In the vertical plane, the bracket should be a small scale representation of the Geostationary orbit. This differs depending on what satellite positions you want to receive and what is your location longitude. If you plan to receive satellites that are situated both western and eastern with regard to your longitude, the bracket must be bent in “U” shape. For the other cases it can be straight and placed oblique as it will be shown below. Imagine you sit behind the dish and look at the following drawing.
Multifeed configurations as seen from behind the dish
Let’s take some practical examples:
You live at 15 E and you want to receive 13 E, 5 E and 1 W. All these are western satellites with respect to chosen location. The highest satellite (13 E and 16 E can be considered as such here) is at the edge of the holder. No matter what will be the center LNB (although it is recommended to be on 5 E), you’re in situation B.
You live at 15 E and want to receive 19 E, 13 E and 5 E. If the center LNB is on 13 E, you’re in situation A. If center is on 19 E, you’re in situation E. Otherwise, if center is on 5 E, you’re in situation D.
You live at 35 E and want to receive 45 E and 52 E. Both are eastern satellites. You’re in situation C.
Situations A, D and E require a bent bracket, in two planes. If you built the vertical one, now you can’t do anything. This is why I recommended the horizontal piece bracket.
The inclination angle of the bracket increases (goes towards vertical) as you approach equator. If you live at equator, the LNB holder is vertical, meaning you can only add LNBs over the top of the central one (with an offset dish).
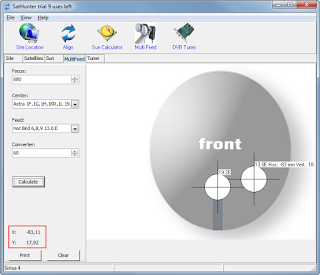
An useful tool for this is the calculator software SatHunter. Note that it is shareware and you only have 10 tries to calculate your multifeed. Don’t forget to set your location correctly.
SatHunter location settings
Then set your focal length and choose the satellites of interest. Note that as opposed to what I have described, this software shows you the front of the dish!
Multifeed calculator
If you prefer to make the calculations yourself, pick two satellites you want to receive and write down their azimuth and elevation (use DishPointer). The formula is this:
where is the focal distance and if then is the horizontal distance between LNBs and if then is the vertical distance between LNBs.
LNB attaching
You must attach LNBs to your homemade bracket. Here is what I suggest. You can make these holders from metal sheets with a thickness of 0.5 … 1 mm.
How to attach LNB to the holder
But where on the bracket do you attach them? The best way is trial and error. Connect the LNB to the receiver (via a DiSEqC switch). Note that the antenna should be pointed to a satellite (as good as possible) with the central LNB and the bracket mounted! Now take the second LNB and move it with your hand across the bracket until you get the best signal. If you built the horizontal type bracket, slightly bend it up and down to improve signal quality. When you’re satisfied, mark the bracket and drill the required holes to fix the LNB.
And one last thing, the holder can stand below the LNB as shown, or on top of them, which is actually better if your holder is “U” shaped (situation A).
The multiple LNB bracket must keep a constant focal distance and must follow the inverted reflection ofClarke orbit. The focal distance depends on antenna and orbit reflection depends on location. The distance between LNBs is proportional with dish diameter. Later I will show how these parameters affect the LNB bracket shape and size.
But now, let’s see what kind of brackets you can build and how will you attach a LNB to them.
The two types oh holders you can build
The first type (upper) uses a metal sheet bent as an arc shape and it sits vertically with the LNBs attached as shown. The second type is an arc shape trimmed sheet that sits horizontally. I would recommend this second type because it is easier to adjust. You can make the bracket from 1 – 2 mm thick aluminium sheet or 0.5 – 1 mm stainless steel.
If you choose the horizontal type, the parameter you take into account for cutting the metal sheet is the focal distance (this is what makes it easy to build for various satellite positions). For the second type, you must follow the orbit projection.
Focal distance
The holder must keep a constant focal distance for the side LNBs. The focal distance is a dish parameter that you should know from its specifications. If you don’t, you can measure it. It is the distance from the point on the dish where the LNB “looks at” and the original LNB holder. The best way to measure it is to insert a 4 cm diameter PVC pipe through the LNB holder and see where it “points to”. Then measure its length. No matter what kind of dish you have, the pipe should point to the horizontal center (in the middle of the horizontal width of dish measured at the current point).
How to measure the focal distance of an offset dish
Now, that you know the focal distance you can make a template for your bracket. You must draw an arc with a radius equal to the focal distance. You can do this with an inextensible wire and a pencil by holding one end of the wire still on the table and drawing with the pen while tied by the wire. Or you can use a drawing software and print the result.
Inkscape example
Inkscape can be used. Draw three circles: one with the focal distance radius and the other ones with a radius smaller by 1 cm and greater by 1 cm. Align the circles in order to “catch” an arc on the page then print it. This is the template for a horizontal type bracket, but can be used for vertical type too, if you bend your piece following the circle (arc) of interest.
The holder should be equally spaced with regard to the center of the dish.
The bracket should have a width of 2 cm and a length of 40 cm to have enough to play with. It’s up to you how you attach it to the dish arm, but keep in mind that you must take into account each LNB holder (I will detail later how you can build those).
Orbit
In the vertical plane, the bracket should be a small scale representation of the Geostationary orbit. This differs depending on what satellite positions you want to receive and what is your location longitude. If you plan to receive satellites that are situated both western and eastern with regard to your longitude, the bracket must be bent in “U” shape. For the other cases it can be straight and placed oblique as it will be shown below. Imagine you sit behind the dish and look at the following drawing.
Multifeed configurations as seen from behind the dish
Let’s take some practical examples:
You live at 15 E and you want to receive 13 E, 5 E and 1 W. All these are western satellites with respect to chosen location. The highest satellite (13 E and 16 E can be considered as such here) is at the edge of the holder. No matter what will be the center LNB (although it is recommended to be on 5 E), you’re in situation B.
You live at 15 E and want to receive 19 E, 13 E and 5 E. If the center LNB is on 13 E, you’re in situation A. If center is on 19 E, you’re in situation E. Otherwise, if center is on 5 E, you’re in situation D.
You live at 35 E and want to receive 45 E and 52 E. Both are eastern satellites. You’re in situation C.
Situations A, D and E require a bent bracket, in two planes. If you built the vertical one, now you can’t do anything. This is why I recommended the horizontal piece bracket.
The inclination angle of the bracket increases (goes towards vertical) as you approach equator. If you live at equator, the LNB holder is vertical, meaning you can only add LNBs over the top of the central one (with an offset dish).
An useful tool for this is the calculator software SatHunter. Note that it is shareware and you only have 10 tries to calculate your multifeed. Don’t forget to set your location correctly.
SatHunter location settings
Then set your focal length and choose the satellites of interest. Note that as opposed to what I have described, this software shows you the front of the dish!
Multifeed calculator
If you prefer to make the calculations yourself, pick two satellites you want to receive and write down their azimuth and elevation (use DishPointer). The formula is this:
where is the focal distance and if then is the horizontal distance between LNBs and if then is the vertical distance between LNBs.
LNB attaching
You must attach LNBs to your homemade bracket. Here is what I suggest. You can make these holders from metal sheets with a thickness of 0.5 … 1 mm.
How to attach LNB to the holder
But where on the bracket do you attach them? The best way is trial and error. Connect the LNB to the receiver (via a DiSEqC switch). Note that the antenna should be pointed to a satellite (as good as possible) with the central LNB and the bracket mounted! Now take the second LNB and move it with your hand across the bracket until you get the best signal. If you built the horizontal type bracket, slightly bend it up and down to improve signal quality. When you’re satisfied, mark the bracket and drill the required holes to fix the LNB.
And one last thing, the holder can stand below the LNB as shown, or on top of them, which is actually better if your holder is “U” shaped (situation A).


Hello great website! Does running a blog such as this take a great deal of work?
ReplyDeleteI've virtually no understanding of coding however I had been hoping to
start my own blog soon. Anyhow, if you have any suggestions or tips for new blog owners please share.
I know this is off topic nevertheless I simply needed to ask.
Thanks!