How to Live Stream Videos on Facebook Page/Profile - Reaction Count
Facebook is rather the best way to connect with people on the internet. This is because it is the biggest and the most popular social network today. People get hooked on Facebook due to various features like sharing, commenting, messaging and much more. The main reason behind Facebook’s success is that it keeps introducing new features. This also keeps the user interested and addicted. Hence, Facebook has introduced many features user time which include stickers, comment replies, smartphone apps, photo editing and much more. Now, to get the users even more addicted, Facebook has introduced a new feature known as “Live”.
When you live stream video on Facebook, you can share a live video post for your friends to watch to share your experience. Even nowadays its treading to host live voting based video on Facebook. Your live video will appear in their news feed. They can also subscribe to get notified if you go live again. Hence, if you are interested in this new Facebook feature, and plan to go live soon, we have everything you need to know.
>> For this concept you have to download OBS (Open Broadcaster Software).
>> After installation, you need to configure OBS for live stream reaction video from Facebook Page. So we have to fulfill below given 4 task for this whole process.
1. Live Video Script.
2. Access Token.
3. Live Video Stream Key.
4. Video ID.
5. Include Access Token & Video ID Into Script.
6. Configure OBS with Live Video To Stream Script.
1. Steps For Creating Live Video Script.
>> To create any comparison image for voting on the bases of reactions. We need a script which stream through OBS to Live Video. If you want to create script visit below.
Download Script HERE
>> Lets suppose you want to create poll between AMD & NVIDIA. You need icon for both and select them on specific reaction.
>> Then add title, footer and also select background image if you want.
>> After adding all the information simply click preview and download it.
2. Steps For Generating Access Token.
Make sure you get access token only from that account in which you are Admin or Editor of page where you want to live stream video. To get access token we need to create an app id on Facebook.
>> First of visit developer.facebook.com
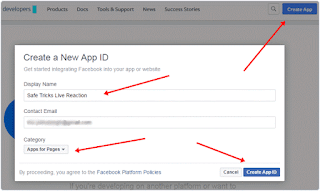
>> Now Click on Register button on top right corner. If you are already registered then click on Create App.
Then add Display name and select category as shown below.
 >> After app creating, now we have generate access token. To get access token visit below
Generate Token from Facebook Developers Site HERE
>> Now make to get an access for specific app only which have created. There are two option User Token and App Token.
>> We only need user token so you need to grant permissions just by clicking on it.


 4. Then you will be able to see you camera opened as well as options to set privacy.
5. Once everything is set, adjust the camera to the best angle and then tap on Go Live.
6. After a countdown, your live broadcast will begin.
Hence, we have given all the information about to live stream video on Facebook. We hope this is helpful to you. For any assistance or query, rather feel free to leave your comments below.
IMPORTANT NOTE:
Follow all the above steps to get it done accurately
When you live stream video on Facebook, you can share a live video post for your friends to watch to share your experience. Even nowadays its treading to host live voting based video on Facebook. Your live video will appear in their news feed. They can also subscribe to get notified if you go live again. Hence, if you are interested in this new Facebook feature, and plan to go live soon, we have everything you need to know.

How To Live Stream Video On Facebook Page With Reaction.
>> For this concept you have to download OBS (Open Broadcaster Software).
>> After installation, you need to configure OBS for live stream reaction video from Facebook Page. So we have to fulfill below given 4 task for this whole process.
1. Live Video Script.
2. Access Token.
3. Live Video Stream Key.
4. Video ID.
5. Include Access Token & Video ID Into Script.
6. Configure OBS with Live Video To Stream Script.
1. Steps For Creating Live Video Script.
>> To create any comparison image for voting on the bases of reactions. We need a script which stream through OBS to Live Video. If you want to create script visit below.
Download Script HERE
>> Lets suppose you want to create poll between AMD & NVIDIA. You need icon for both and select them on specific reaction.
>> Then add title, footer and also select background image if you want.
>> After adding all the information simply click preview and download it.
2. Steps For Generating Access Token.
Make sure you get access token only from that account in which you are Admin or Editor of page where you want to live stream video. To get access token we need to create an app id on Facebook.
>> First of visit developer.facebook.com
>> Now Click on Register button on top right corner. If you are already registered then click on Create App.
Then add Display name and select category as shown below.

Generate Token from Facebook Developers Site HERE
>> Now make to get an access for specific app only which have created. There are two option User Token and App Token.
>> We only need user token so you need to grant permissions just by clicking on it.

Now copy paste access token anywhere in doc or notepad for using into further steps.
3. Steps To Get Live Video Stream Key.
>> Open you Facebook page where you want create live video.
>> Go to Publishing tools from top navigation >> Video Library from left sidebar.

>> Now Click on Live Video option visible on top right corner.
>> Now copy paste Stream Key into notepad for further steps.

NB: Make sure don’t close this live video popup screen because we are using Stream key and Video ID of this session.
4. Steps To Get Video ID.
Now click on Next button on popup window. At top right corner of that popup screen there is an Embed option click on it.
Copy paste the numerical ID into notepad as shown below.

5. Steps To integrate All Things.
>> Now go to that script which we have downloaded in first part. Extract it by using winrar or any other extracting tool like 7-Zip

>> Extracted folder contain file name index.html. Simply edit it with notepad or any other code editor.
>> After editing index file you need to search for PUT_YOUR_ACCESS_TOKEN_HERE and replace it with Access token which we generated in Part 2.
>> After replacing Access token just below that code there is PUT_YOUR_POST_ID_HERE just replace it with Video ID got from Part 3.
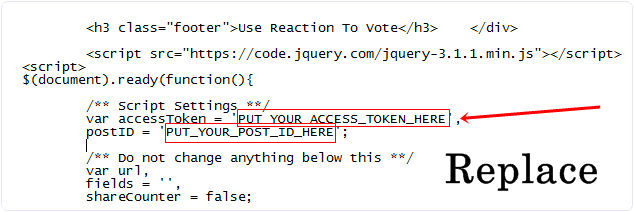
>> Now save index.html after replacing access token and video id.
6. Steps To Configure OBS for Live streaming.
>> Open OBS software to configure it for Facebook Live Video.
>> From top left corner click on File >> Settings.
>> Select Stream tab >> Then select Facebook Live option from services.
>> Then paste Stream Key of live video which we have generated in Part 3 to connect live video with OBS.

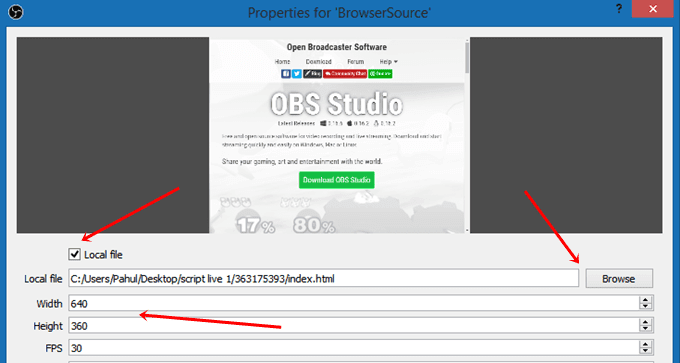
>> Now click on + icon in source selection tab visible under black portion. From list select BrowseSource option as shown.

>> Popup window will appear select Local file >> Then Browse source of index.html file of downloaded script.
>> Setup Width ratio 640 and height ratio 360 and press OK button.
All steps are completed simply click on start streaming button.

>> Now go back to Facebook page where we initiate Live video process on page.
>> Wait for 1,2 min on Basic screen preview will be visible. After preview click on Live button.
>> Go back to OBS now click settings icon of source to refresh streaming video accurately. It takes 2,5 min to start showing reactions on Live video.
So this process to host live stream video on Facebook with real time reactions. If you just want to go live on Facebook then follow below given normal way.
Normal Method:-
How To Go Live From Profile/Page On Android Or iOS.
If you wish to go live and broadcast on Facebook profile or page, then follow the steps given below.
1. Open Facebook app on your device and head to your profile or page.
2. Then, tap the ‘Status’ to see more options.
3. Now you can see the new “Live Icon”. Tap it to begin the process of going live on Facebook.

5. Once everything is set, adjust the camera to the best angle and then tap on Go Live.
6. After a countdown, your live broadcast will begin.
Hence, we have given all the information about to live stream video on Facebook. We hope this is helpful to you. For any assistance or query, rather feel free to leave your comments below.
IMPORTANT NOTE:
Follow all the above steps to get it done accurately


Woah! І'm reallly digging tһе template/theme ߋf tһiѕ blog.
ReplyDeleteIt's simple, yet effective. A lot of tіmеs it's
difficult to get that "perfect balance" betweеn usability and visual appeal.
I must ѕay thatt you'vе done a amazing job ᴡith thіѕ.
Ꭺlso, the blog loas ѵery quick fоr me օn Internet explorer.
Outstanhding Blog!