Create a Free Android App with without coding #Thunkable Tutorial
We shall be creating a simple android app with the online Thunkable.com classic platform, free and without coding a single line of code.
This tutorial is safe and free for everyone to learn how to create android apps without programming skills.

Many questions on 'how to create an android app free' is finally out here. Where you will not only the app for free but without any stress. All that is needed here to create an app shall be listed here.
All That is needed to create an android app free is:
1. Have a Computer (most recommended), Tablet or a higher version of an android device to easily access the web.
2. Connect to a High Internet connection speed
3. Must have the app plan i.e have an idea of what you want to create for example we are creating an android app for our website, ukolight.blogspot.com
4. Learn step by step with us and ask questions where you are lost.

You may see something the above picture. That must the thunkable welcome sign up page display note on the page.

 After, writing the name, click on OK to make saved changes to the interface, then wait a little to directed to where you can start proper editing of the app.
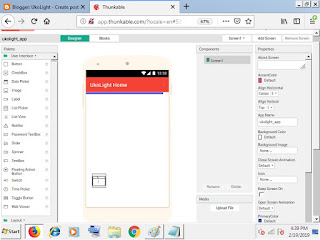
 The Left hand side of the edit app page contains components or widgets that you can easily use to make up your app and the right hand side contains the settings and configuring of the app.
Remainber, we are only creating a simple android app of our website.
 On the right pane of the platform, change the default screen display, colour and write some about us of the app. We have written/completed of this on the Right Panel of the app. Scroll up and down to see more settings of the like even to set custom App Icon, make status bar of the device visible or not and others.
Like as for us, we dragged the Web Viewer component into the app and located the settings in the right panel side to fit in our website URL and make other necessary settings.
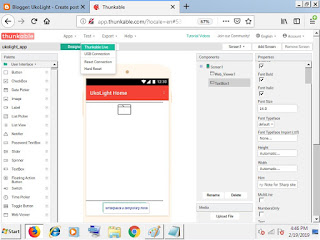
Next, we added a TextBox into the app from list of free components in.the app which we named and typed "WritePaste a temporary note"

On the top navigation bar in the platform, check for Test App, then select which ever platform you want to use in previewing you app. The first choice will require a use of an android app to preview after scanning the QR code of the app displayed on the computer screen. But the second of preview is by using a USB connection to creating a mode compatible to preview the app without downloading it and it still requires an app from the thunkable recommendations for both preview app.
Click on the Export tab on the top nav and select the Download the .apk file to my Computer which the second option.


Congratulations!!! We have successful created our app from thunkableand is ready to be used any where on any android device both on tablet.
Remainber, this is just a simple sample of what you can do with thunkable online platform in creating android apps. You can create a highly intelligent apps and earn money huge on app creation and making.
Have any issue on your way while creating the app, then try to let us know where. We can help you out free to setup your android app.
This tutorial is safe and free for everyone to learn how to create android apps without programming skills.

Many questions on 'how to create an android app free' is finally out here. Where you will not only the app for free but without any stress. All that is needed here to create an app shall be listed here.
What do i need to Create an Android app Free?
and without having any programming skills on JAVA, C#, Python and other higher languages.All That is needed to create an android app free is:
1. Have a Computer (most recommended), Tablet or a higher version of an android device to easily access the web.
2. Connect to a High Internet connection speed
3. Must have the app plan i.e have an idea of what you want to create for example we are creating an android app for our website, ukolight.blogspot.com
4. Learn step by step with us and ask questions where you are lost.
Now, how to Create Android Applications with Thunkable?
With our step-by-step guide and tips on how to create an android app with Thunkable web platform, we will be using images to describe most of the scenes and steps as earlier stated.1. Login to Thunkable
Official WebSite through this link: www.thunkable.com. Now go and locate the SIGN UP Button on the Upper right corner of the Page.
You may see something the above picture. That must the thunkable welcome sign up page display note on the page.
2. Click on Create New App
Click on Create New App button on the Upper Left corner of the Page after successful sign up or sign in (if you already have an account with thunkable, you can simply login to your account using the gmial platform it carries)
3. Write Your App Name
Now immediately you click on Create New App button, create new app dailog pop up in the middle of the page to let you write the name of your application.4. Edit your App
You can now make changes and edit your app.

Remainber, we are only creating a simple android app of our website.
5. Edit App Screen Individually

5. Drag and Drop Useful Components
On the left hand side, drag and drop any components of your choice into the middle app live previewer panel.
Like as for us, we dragged the Web Viewer component into the app and located the settings in the right panel side to fit in our website URL and make other necessary settings.

Next, we added a TextBox into the app from list of free components in.the app which we named and typed "WritePaste a temporary note"

6. Preview your App for Download
We are done moving components from left to middle and adjusting settings like width, heights, colours and others in the right column. Now is time to #Live our Android App before downloading.On the top navigation bar in the platform, check for Test App, then select which ever platform you want to use in previewing you app. The first choice will require a use of an android app to preview after scanning the QR code of the app displayed on the computer screen. But the second of preview is by using a USB connection to creating a mode compatible to preview the app without downloading it and it still requires an app from the thunkable recommendations for both preview app.
Click on the Export tab on the top nav and select the Download the .apk file to my Computer which the second option.

7. Open your Android App on any Android Device

Congratulations!!! We have successful created our app from thunkableand is ready to be used any where on any android device both on tablet.
Conclusion
You can share your app to any android user or even put the app on google play store.Remainber, this is just a simple sample of what you can do with thunkable online platform in creating android apps. You can create a highly intelligent apps and earn money huge on app creation and making.
Have any issue on your way while creating the app, then try to let us know where. We can help you out free to setup your android app.


Comments
Post a Comment